I'm so grateful when listeners send in their art. This one is of Aradine, post hanging. Honestly, this is exactly how I imagine her, too. Thanks very much to Simon JH Williams for this!


I'm so grateful when listeners send in their art. This one is of Aradine, post hanging. Honestly, this is exactly how I imagine her, too. Thanks very much to Simon JH Williams for this!
I started out with a watercolour painting (that isn't very good) and used a phone app to bring out the nuances for this one.

Decided to go a little off script and try to make some furnishings using leftover styrofoam, foamcore and other stuff around the house. I had some hits and some misses. Here's what I made:
1. First I cut some shapes using a boxcutter and glued on a foamcore base so it would sit flat. Then I applied the black paint & Mod Podge combo. For pillars, I tore off chunks to simulate ruin. For the doors, I carved in bricks and a door design with a dull pencil. For the rest, I didn't do anything, because the porous quality of the foam looked good already. I stuck screws in the tall pieces to keep them bottom heavy before I stuck on the base.

2. Next, I painted everything grey. I wanted a good amount of paint on these because I knew from Youtube videos that spray propellant 'eats' styrofoam (but the paint protects it).
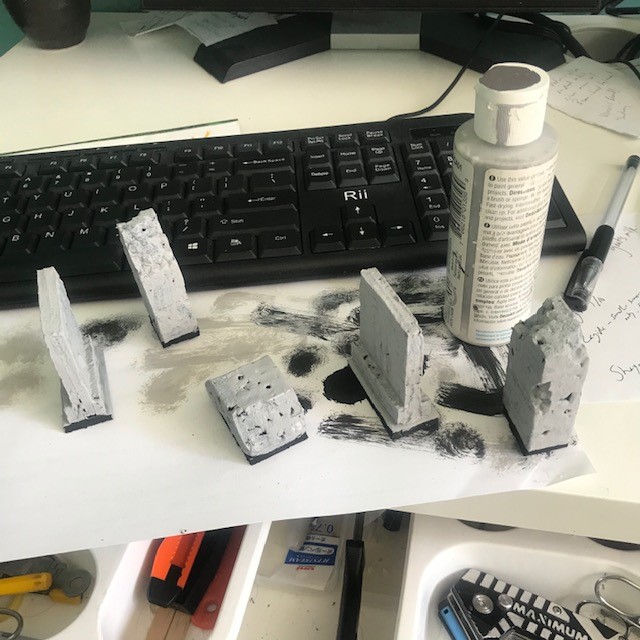


5. Almost done now. The 2nd last step is a blackwash. I had to give it 2 coats to get the right look.

6. Last step: Clearcoat spray. I found 1 coat was enough this time.


Verdict: Pretty good. I'm happy with most pieces. I am glad I put the screws in to weight them down, though I do think that they still feel too light. A breeze could knock it all over. If the floor tiles are only 98% flat, they make the whole setup move around on the table... not great. In the end. It all looks good enough, but is it useful?
That's why, if I did it all again (and I might), I would at least do the floor tiles a different way.
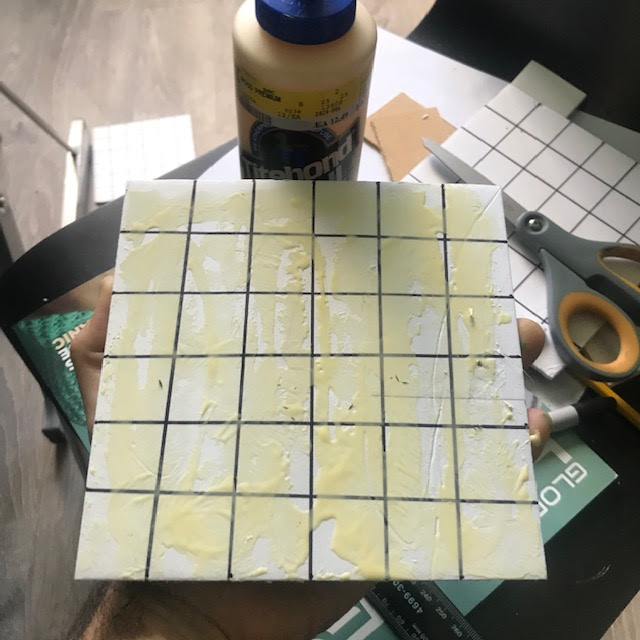
I had one of these bathroom tiles left over from a reno. They are nice and heavy. 3"x6" exactly, too! And...perfectly flat.

You could mount the foamcore on top, but I also had some of this...

So I sculpted the grout on the tile with a Q tip with the end cut off. The stuff is not very easy to work with, but eventually I got this result. (You can see I tried it on foamcore too.)




About 2 or 3 weeks ago, I posted a pair of small roles to CastingCallClub.com. I got nada. Nothing. Zero by way of auditions or interaction and so I chalked it up to a good try, but ultimately a waste of effort.
Instead, I put out the call on Twitter and got 20 DMs on the first day. Much more than I had expected. And then... I got 2 auditions on CCC.
Nice to have so many talented people to choose from, but I hate to turn down anyone who has an interest in the show. Man, what timing!
If you are reading this and you are one of those people - or if you're reading this and you've thought about getting in touch to do a voice - well, I just wanted to say that if you are patient, I will try my best to involve everyone who wants to be a part of the show. Honestly, it is very flattering that so many people are interested & I want you to know I appreciate that interest: I will make a place in the show for you.
Here's the map I used for the episodes that take place in the convent. Once again, I used Dungeonscrawl.com for most of the design.

Theme Evan King - Enchiridion https://www.youtube.com/watch?v=a8NkG3bhIxU
Welcome 148 Barovian
Castle https://tabletopaudio.com/
Previously On Scott Buckley -
Legionnaire https://www.youtube.com/watch?v=NwW0vFUCzEM
2nd half of part 1 “Heart: Absolution” https://tabletopaudio.com/
Dramatis RPG SOUNDS
“Realization”
Final Scene (7 days ago…) Kevin MacLeod “Unnatural Situation” - https://www.youtube.com/watch?v=VsjSb9oFLZI
Some FX: https://www.zapsplat.com
I waste a lot of time cruising Youtube. At some point I started to check out videos on 'Dungeon Crafting' - you know, making battlemats and scenery out of foam and painting it. I had zero intention of making any. I just thought it was wildly creative and interesting.
At some point I came across the Professor Dungeon Master's Guide to Making Dungeon Tiles. I realized I literally had everything on hand to at least improvise making some. So I gave it a shot. The extremely weird thing is that I don't own a single miniature. Not one. I just wanted to see if I could do it.
Turns out that, more or less, I can. And if I can, I bet you can. So if you've thought about it, I'd say give it a go. Here's the steps I took and what I learned along the way.
1 Cut the Foam. For some reason Prof DM suggests 6" x 6". I cut a variety of 6x6, 3x6 and 2x6. You need to use a ruler to draw out the grid in pencil first, but it turns out that you don't need to draw the flagstones; just get a kind of dull pencil and carve them. Dig in. You want noticeable grooves. My first pair were done with a light touch and are the 2 worst ones. Also, I should have made the tiles double thick here - something I ended up doing later later. Do it now so you can cut them at the same time. It'll save headaches later on.

2. Mix black paint and Mod Podge. Coat everything. Don't skip this step... this is what makes them durable.

3. Paint it again with a light tan. Some of mine I did one streaky single coat (like in the photo) and some with 2 coats. The ones with 2 coats turned out much better. At this point you will feel like it looks terrible. That's OK.

4. Paint some stones grey, some brown, some... I dunno... another brown. Vary it up.

5. Make a blackwash. Put in a single drop of dishsoap. Too much soap and you'll get suds. Suds are bad.

6. Give it 2 coats of clearcoat spray. Let it dry a full day between coats.

